name: inverse layout: true class: center, middle, inverse --- # WPKG Express 2 ## A web-based frontend to WPKG .red[*] WPKG Express 2 based on [wpkgExpress](https://code.google.com/archive/p/wpkgexpress) by Brian White ©2009 .footnote[ .red[*] [WPKG](https://wpkg.org/WPKG_overview) is an automated software deployment, upgrade and removal program for Windows ] --- ## What is WPKG and what allows you to do? --- layout: false .left-column[ ## What is WPKG? ## What allows you to do? ] .right-column[ WPKG is an automated Windows software deployment system. Implemented as a JS script. The configuration files are XML files. Analogs: - OneGet; - NuGet; - Chocolatey. WPKG allows: - Collect programs (packages) into dependency chains; - Group packages into lists (profiles); - Allows you to map multiple profiles (hosts) to one computer; - It has a flexible system of checks and attributes applied to various parts of the system; - Allows you to generate detailed logs with a description of the actions performed and their result. ] --- .left-column[ ## What is WPKG? ## What allows you to do? ## What tasks does WPKG Express 2 solve? ] .right-column[ WPKG Express 2 allows you to solve the following tasks: - Parse WPKG script log files, followed by sending email to the administrator; - Parse WPKG script database files, followed by generating: * a list of installed packages for a specific PC; * diagrams of installed versions for a specific package. - To form a graph of the relationship between the PPH .red[*]; - Generate a WPKG script settings file and a configuration file for WPI .red[**]; - Create, upload and download XML files of the PPH .red[*]. ] .footnote[ .red[*] Packages, Profiles and Hosts .red[**] [Windows Post-Install Wizard](https://msfn.org/board/topic/158274-windows-post-install-wizard-main-thread) ] --- template: inverse ## WPKG Infrastructure --- layout: false .left-column[ ## WPKG Infrastructure ] .right-column[ WPKG implementation will require: - A server with the Domain Controller role (Ldap server) for: * Authentication (only "Active Directory"); * WPKG client deployments using Group Policy; * Receiving a list of active client computers ("Active Directory", "Samba" or "OpenLDAP"). - File server with shared SMB resources for: * Software distributives files; * WPKG Script Log files; * WPKG Script Database files. ] --- layout: false .left-column[ ## WPKG Infrastructure ] .right-column[ WPKG implementation will require: - Web server and database server ("MySQL" or "Postgres") for WEB Interface (WPKG Express 2); - Client computers containing a WPKG script and a WPKG client. Not necessary: - [GraphViz](https://www.graphviz.org) to create dependency graph of "Packages", "Profiles" and "Hosts"; - [smbclient](https://www.samba.org/samba/docs/current/man-html/smbclient.1.html) to access log files and databases of client computers for parsing content; - SMTP Server to send mail notifications to the administrator. ] --- template: inverse ## WPKG Express 2 UI --- layout: false name: home-page .left-column[ ## Home page ] .right-column[ .center[[](/wpkg-express-2/img/home-page.png)] Various statistics are displayed on the home page. - To change the search area, press the button (1); - The number of errors detected is displayed next to the "Logs" menu item (2); - Quantitative information about the status of packets on client PCs is displayed on the bar (3); - Quantitative information about the status of logs on client PCs is displayed on the bar (4). ] --- .left-column[ ## Home page ] .right-column[ - Information on the last change of records is displayed in the block (5); - To export XML configuration files for packages, profiles or hosts, use the buttons (6); - When you hover over menu items, buttons, input fields, the symbol "[?]" or labels underlined with a dotted line, prompts will be displayed. ] --- name: packages-index .left-column[ ## Packages ### - Packages list management and group operations ] .right-column[ .center[[](/wpkg-express-2/img/packages-index.png)] - In order to open the list of packages, select the menu item "Packages" → "List of packages" (1); - To create a new package, select the appropriate item in the "operations menu" (2); - To perform operations on a package, such as [editing](#packages-edit), copying, deleting and others, click on the appropriate operation button in the line of the selected package (3); ] --- .left-column[ ## Packages ### - Packages list management and group operations ] .right-column[ - To display filter-based packages, expand the condition line (12). The condition of the current filter is displayed in (11). You can change the condition for grouping strings in (4); - To [view](#packages-view) the package, click on the ID of the required package (5). When hovering, brief information about the package is displayed. - To change the direction of sorting packages, click on the name of the required column (6); - To perform a group operation on the selected packages, press the button (7). To perform the operation, press the button (8). To select all rows, press the button (9); - To change the number of displayed packages on the page, select the required value from the list (10); - To clear the saved state of the filter (11), sort order (6) and number of lines on the page (10), click on the link "Packages" in breadcrumbs (13). ] --- name: packages-edit .left-column[ ## Packages ### - Packages list management and group operations ### - Add / edit package ] .right-column[ .center[[](/wpkg-express-2/img/packages-edit.png)] ] --- name: packages-edit .left-column[ ## Packages ### - Packages list management and group operations ### - Add / edit package ] .right-column[ - The progress of filling the form fields is displayed on the bar (1); - To change the group of fields use the tabs (2); - To generate a package ID based on its name, use the button (3). Pressing again changes the ID generation strategy. - To save the information, use the button (4). ] --- name: packages-create .left-column[ ## Packages ### - Packages list management and group operations ### - Add / edit package ### - Create a package based on a template ] .right-column[ .center[[](/wpkg-express-2/img/packages-create.png)] A template can be any package for which the "Template" property is set to yes. ] --- .left-column[ ## Packages ### - Packages list management and group operations ### - Add / edit package ### - Create a package based on a template ] .right-column[ - To select a template, use the list (1); - To enter the package ID and its name, use the fields (2) and (3); - To create a package, use the button (4) After installation, package templates are available for installers of the following types: - [Inno Setup](https://jrsoftware.org/ishelp/topic_setupcmdline.htm); - [InstallShield](https://helpnet.flexerasoftware.com/installshield19helplib/helplibrary/IHelpSetup_EXECmdLine.htm); - [MSI](https://docs.microsoft.com/en-us/windows/win32/msi/command-line-options); - [NSIS](https://nsis.sourceforge.io/Docs//Chapter3.html). ] --- name: packages-view .left-column[ ## Packages ### - Packages list management and group operations ### - Add / edit package ### - Create a package based on a template ### - View package information ] .right-column[ .center[[](/wpkg-express-2/img/packages-view.png)] - To perform operations on a package, such as [editing](#packages-edit), copying, deleting and others, select the appropriate item in the "operations menu" (1); - To view extended package information, switch the tab (2); ] --- .left-column[ ## Packages ### - Packages list management and group operations ### - Add / edit package ### - Create a package based on a template ### - View package information ] .right-column[ - To view additional information about the package, switch the tab (3); - To view information about a group of package actions, switch the tab (4); - To add a new package action, edit the package action groups or check the status of the package action list, use the buttons (5); - To edit, delete, move the action of the package, use the buttons (6); - If the setting "Application settings" → "Extended settings" → "System" → Auto variable% Revision% is enabled, automatically updated variables "% Revision%" and "% RevI {n}%" will be created in the package (7). ] --- name: packages-preview-xml .left-column[ ## Packages ### - Packages list management and group operations ### - Add / edit package ### - Create a package based on a template ### - View package information ### - Preview XML package ] .right-column[ .center[[](/wpkg-express-2/img/packages-preview-xml.png)] ] --- .left-column[ ## Packages ### - Packages list management and group operations ### - Add / edit package ### - Create a package based on a template ### - View package information ### - Preview XML package ] .right-column[ - If the package configuration XML (2) does not pass the validation scheme, lines containing errors will be highlighted; - To download or edit the package configuration XML file, use the "operations menu" (1). ] --- name: packages-edit-xml .left-column[ ## Packages ### - Add / edit package ### - Create a package based on a template ### - View package information ### - Preview XML package ### - Edit XML package ] .right-column[ .center[[](/wpkg-express-2/img/packages-edit-xml.png)] ] --- .left-column[ ## Packages ### - Add / edit package ### - Create a package based on a template ### - View package information ### - Preview XML package ### - Edit XML package ] .right-column[ - To start editing, place the cursor in the editor window (1); - Press Ctrl-Space, or type a "<" character to activate autocompletion; - Press Ctrl-J to jump to the tag that matches the one under the cursor; - To save the information, use the button (2). ] --- name: packages-view-graph .left-column[ ## Packages ### - Create a package based on a template ### - View package information ### - Preview XML package ### - Edit XML package ### - View package relationship graph ] .right-column[ .center[[](/wpkg-express-2/img/packages-view-graph.png)] - To download the package relationship graph file, use the "operations menu" (1); - To enable the full graph display mode (including Profiles and Hosts), use the checkbox (2); ] --- .left-column[ ## Packages ### - Create a package based on a template ### - View package information ### - Preview XML package ### - Edit XML package ### - View package relationship graph ] .right-column[ - By clicking on the package ID (3), the page for [viewing information](#packages-view) about this package will open; - The name of the link is displayed next to the arrow (4); - To change the graph scale, use the buttons (5). ] --- name: packages-view-chart .left-column[ ## Packages ### - View package information ### - Preview XML package ### - Edit XML package ### - View package relationship graph ### - View chart of the installed versions ] .right-column[ .center[[](/wpkg-express-2/img/packages-view-chart.png)] - The total number of installed packages is displayed in line (1); - The percentage of installed package versions is displayed in line (2); - When clicking on the sector of the diagram (3), the reports page for this version of the package opens. ] --- name: packages-additional-information .left-column[ ## Packages ### - Preview XML package ### - Edit XML package ### - View package relationship graph ### - View chart of the installed versions ### - Additional information ] .right-column[ - The variable input field supports auto-completion of variable names starting with the symbol "%". To manage global variables use the menu item "Application settings" → "Global variables". - Path input fields and checks values also support autocompletion of variable names. - The package action command input field supports the following auto-completion: * variable names starting with the symbol "%"; * command line switches starting with the symbol "/"; * command line actions starting with the string "%ComSpec%". - The package action exit code input field supports auto-completion. Also, a hint is displayed below the input field with information from the directory of exit codes. ] --- .left-column[ ## Packages ### - Preview XML package ### - Edit XML package ### - View package relationship graph ### - View chart of the installed versions ### - Additional information ] .right-column[ - Package ID can be case sensitive if the "Matching of package and profile IDs is case sensitive" option is enabled: "Application settings" → "Settings of WPKG" → "Menu of operations" → "Edit settings" → "Flags - part 3" → "Matching of package and profile IDs is case sensitive". ] --- name: profiles-index .left-column[ ## Profiles ### - Profiles list management ] .right-column[ .center[[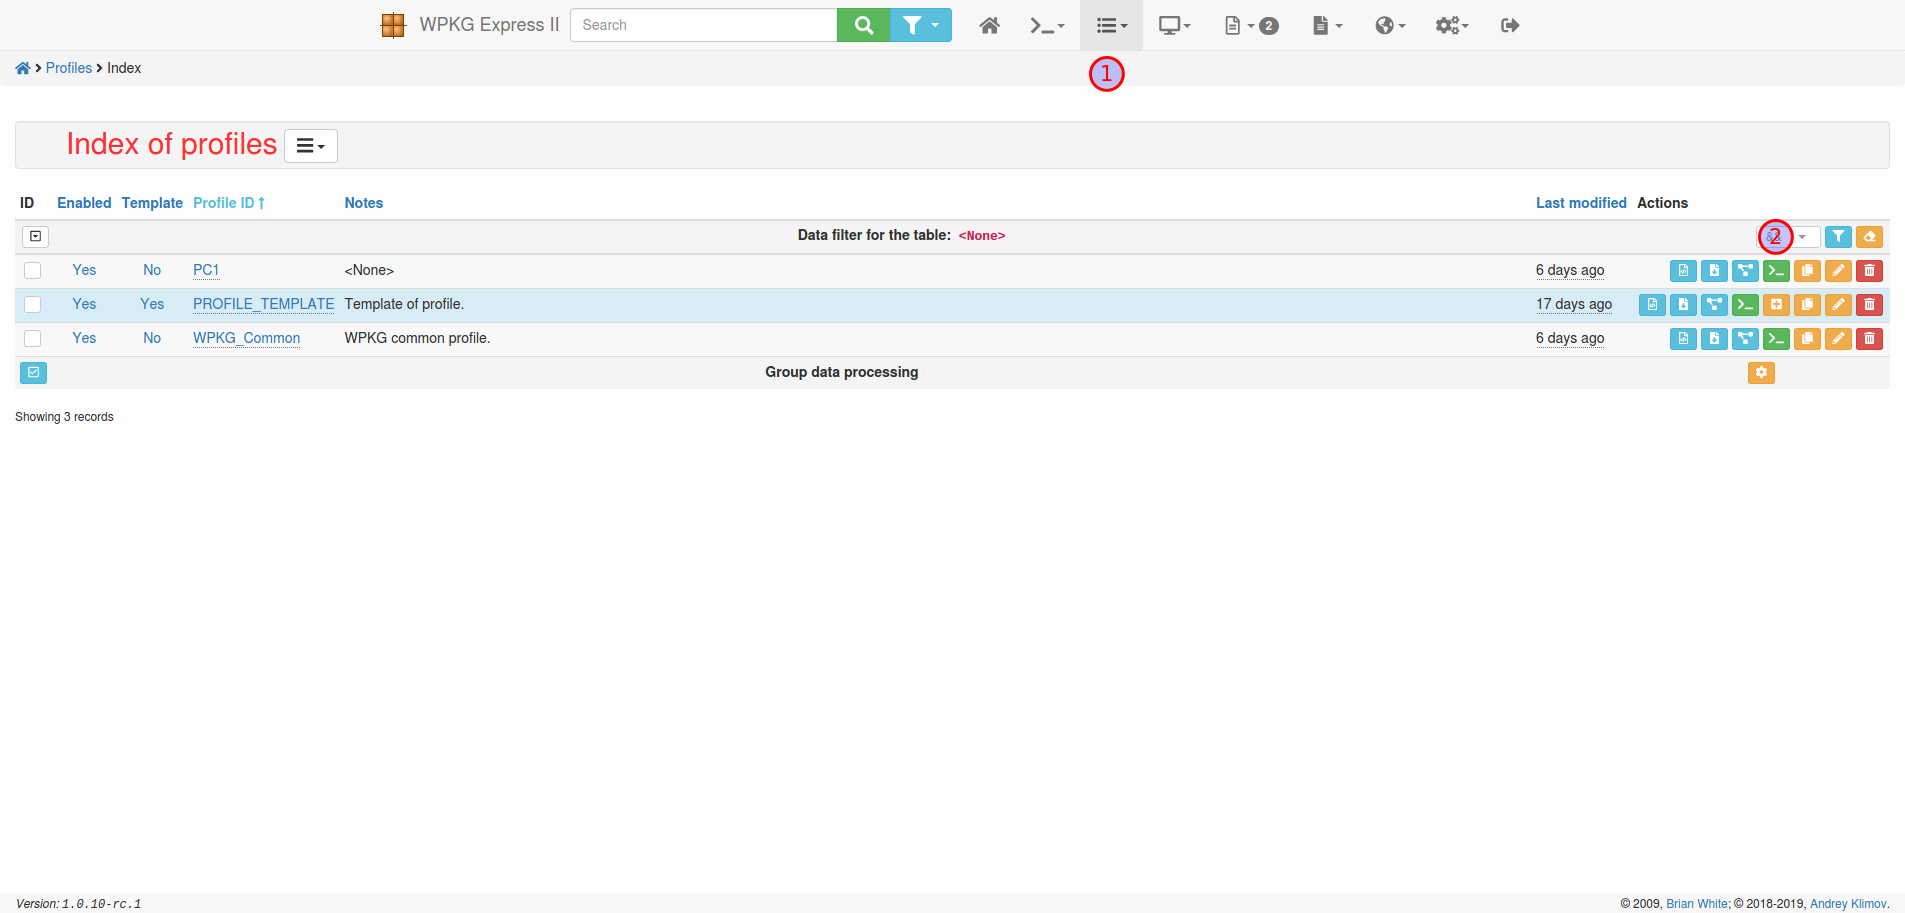](/wpkg-express-2/img/profiles-index.png)] Everything is like [package](#packages-index) management except: - In order to open the list of profiles, select the menu item "Profiles" → "List of profiles" (1); - [Modifying associated packages](#profiles-packages-edit) for profile (2). ] --- name: profiles-packages-edit .left-column[ ## Profiles ### - Profiles list management ### - Modifying associated packages ] .right-column[ .center[[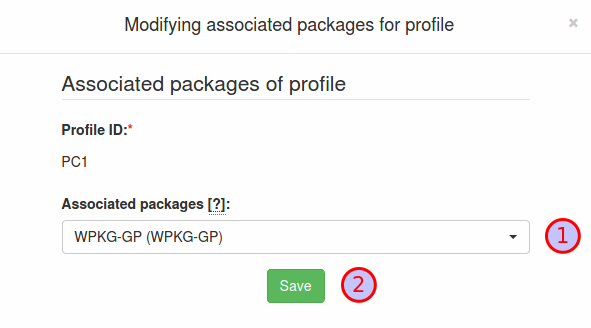](/wpkg-express-2/img/profiles-packages-edit.png)] - To select packages to add to the profile, use the list (1); - To save the information, use the button (2). ] --- name: profiles-additional-information .left-column[ ## Profiles ### - Profiles list management ### - Modifying associated packages ### - Additional information ] .right-column[ - Profile ID can be case sensitive if the "Matching of package and profile IDs is case sensitive" option is enabled: "Application settings" → "Settings of WPKG" → "Menu of operations" → "Edit settings" → "Flags - part 3" → "Matching of package and profile IDs is case sensitive". ] --- name: hosts-index .left-column[ ## Hosts ### - Hosts list management ] .right-column[ .center[[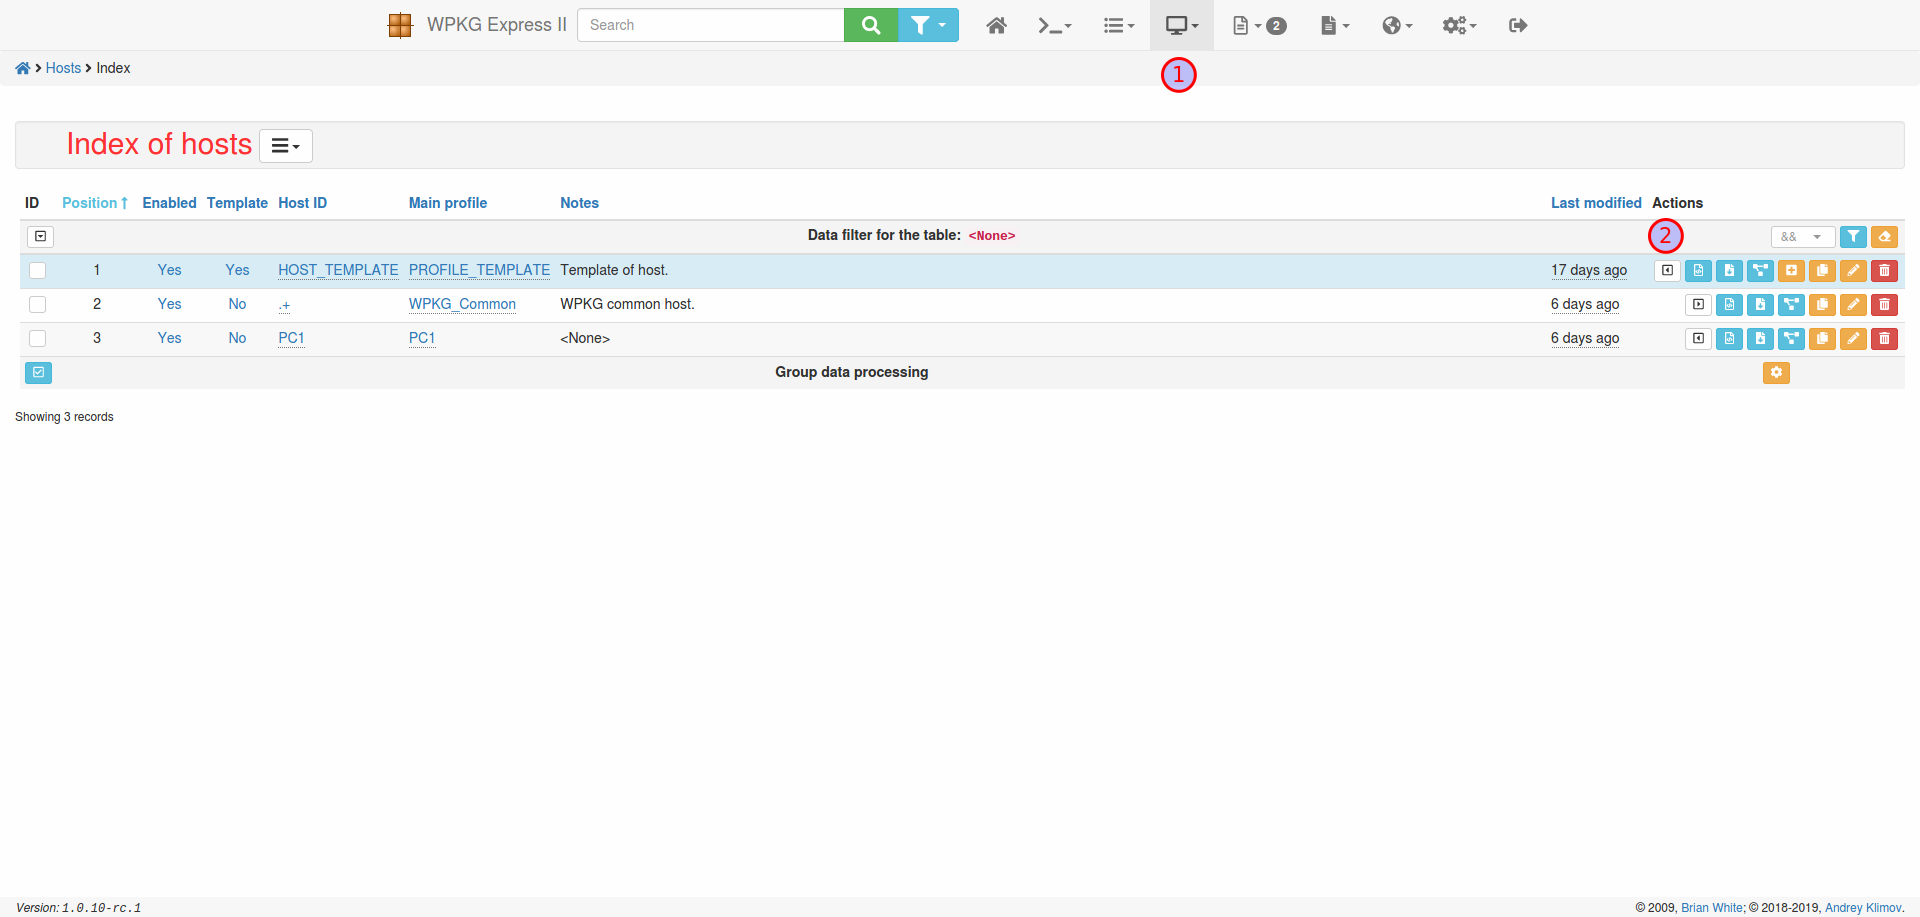](/wpkg-express-2/img/hosts-index.png)] Everything is like [package](#packages-index) and [profile](#profiles-index) management except: - In order to open the list of hosts, select the menu item "Hosts" → "List of hosts" (1); - Changing the host position in the host list (2); - [Generating hosts and profiles](#hosts-generate) from templates based on LDAP data; - [Graph of the data for host](#hosts-build-graph) by name. ] --- name: hosts-generate .left-column[ ## Hosts ### - Hosts list management ### - Generating hosts and profiles ] .right-column[ .center[[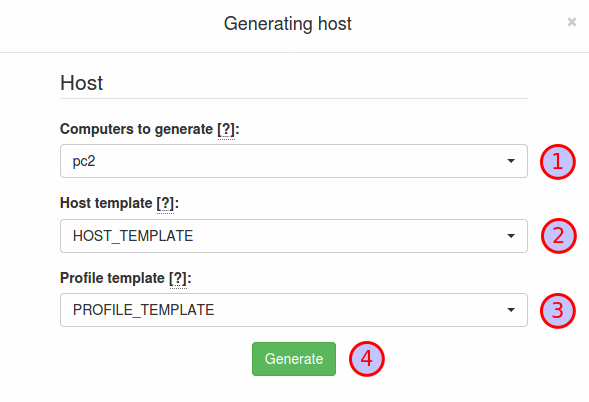](/wpkg-express-2/img/hosts-generate.png)] - Use the list (1) to select PC names from LDAP; - Use the lists (2) and (3) to select the Host and Profile templates; - To generate Hosts and Profiles, use the button (4). ] --- .left-column[ ## Hosts ### - Hosts list management ### - Generating hosts and profiles ### - Graph of the data for host ] .right-column[ .center[[](/wpkg-express-2/img/hosts-build-graph.png)] - To specify the name of the PC, use the field (1); - To create a graph, use the button (2); - Other actions are similar to [viewing](#packages-view-graph) the package relationship graph. ] --- name: hosts-additional-information .left-column[ ## Hosts ### - Hosts list management ### - Generating hosts and profiles ### - Graph of the data for host ### - Additional information ] .right-column[ - The host ID may be a [regular expression](https://en.wikipedia.org/wiki/Regular_expression), for example, "PC\d{1,4}"; - Multiple hosts can be applied to one PC if the "Match multiple host entries to a single host" option is enabled: "Application settings" → "Settings of WPKG" → "Menu of operations" → "Edit settings" → "Flags - part 3" → "Match multiple host entries to a single host". ] --- name: logs-index .left-column[ ## Logs ### - Logs management ] .right-column[ .center[[](/wpkg-express-2/img/logs-index.png)] - In order to open the logs, select the menu item "Logs" → "Logs" (1). The number of errors detected is displayed next to the "Logs" menu item (1); - To refresh the logs, select the appropriate item in the "operations menu" (2); - Quantitative information about the status of logs on client PCs is displayed on the bar (3). When clicked, a window opens for viewing all the logs of the corresponding type. - To [view](#logs-view) information about PC logs, use the button (4). ] --- name: logs-view .left-column[ ## Logs ### - Logs management ### - View PC logs ] .right-column[ .center[[](/wpkg-express-2/img/logs-view.png)] - To clear host logs, use the "operations menu" (1). ] --- name: reports-index .left-column[ ## Reports ### - Reports management ] .right-column[ .center[[](/wpkg-express-2/img/reports-index.png)] - In order to open the reports, select the menu item "Reports" → "Reports" (1); - To refresh the reports, select the appropriate item in the "operations menu" (2); - Quantitative information about the status of packets on client PCs is displayed on the bar (3); When clicked, a window opens for viewing all the reports of the corresponding state. ] --- name: mail-error-reporting .left-column[ ## Emails ### - Error reporting ] .right-column[ .center[[](/wpkg-express-2/img/mail-error-reporting.png)] - Error reports are sent out when parsing log files located in the SMB share; - The email contains the following information (1): * Hostname; * Error type; * Error text; * Date the error occurred. - To [view](#logs-index) a complete list of error reports, click (2). ] --- name: mail-disabled-unused .left-column[ ## Emails ### - Error reporting ### - Disabled unused hosts and profiles ] .right-column[ .center[[](/wpkg-express-2/img/mail-disabled-unused.png)] - In order to disable unused Hosts and Profiles, select the menu item "Hosts" → "Disable unused"; - The information for processing is obtained by comparing the list of active computer names received from the LDAP Server with the list of active Host and Profile. Host names are compared as [Regular expressions](https://en.wikipedia.org/wiki/Regular_expression). - The email contains the following information (1): * List of names of processed Hosts and Profiles. ] --- name: creating-config-wpkg .left-column[ ## WPKG service ### - Creating a configuration file for WPKG ] .right-column[ .center[[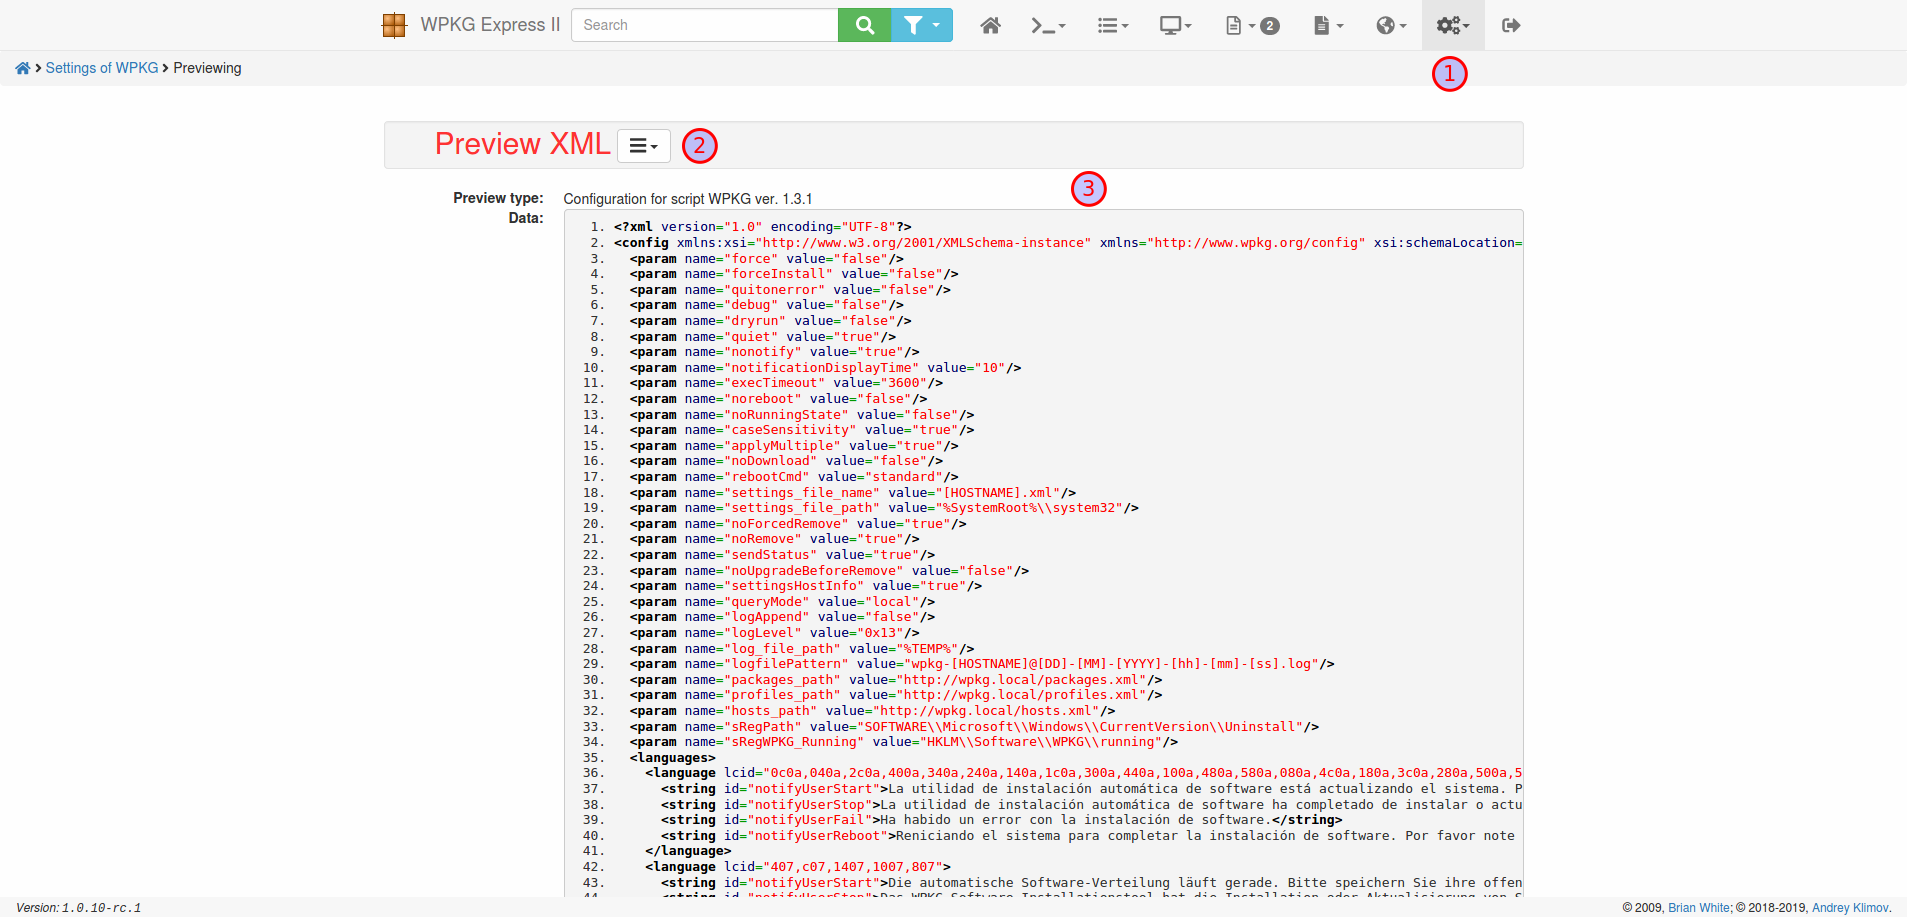](/wpkg-express-2/img/admin-configs.png)] - To create a WPKG configuration file, select the menu item "Application settings" → "Settings of WPKG" (1); - If the WPKG configuration XML (3) does not pass the validation scheme, lines containing errors will be highlighted; ] --- .left-column[ ## WPKG service ### - Creating a configuration file for WPKG ] .right-column[ - Use the "operations menu" (2) to: * Edit or reset to default WPKG settings; * [Global variables](#global-variables) list management; * Download XML configuration file. ] --- name: global-variables .left-column[ ## WPKG service ### - Creating a configuration file for WPKG ### - Global variables list management ] .right-column[ .center[[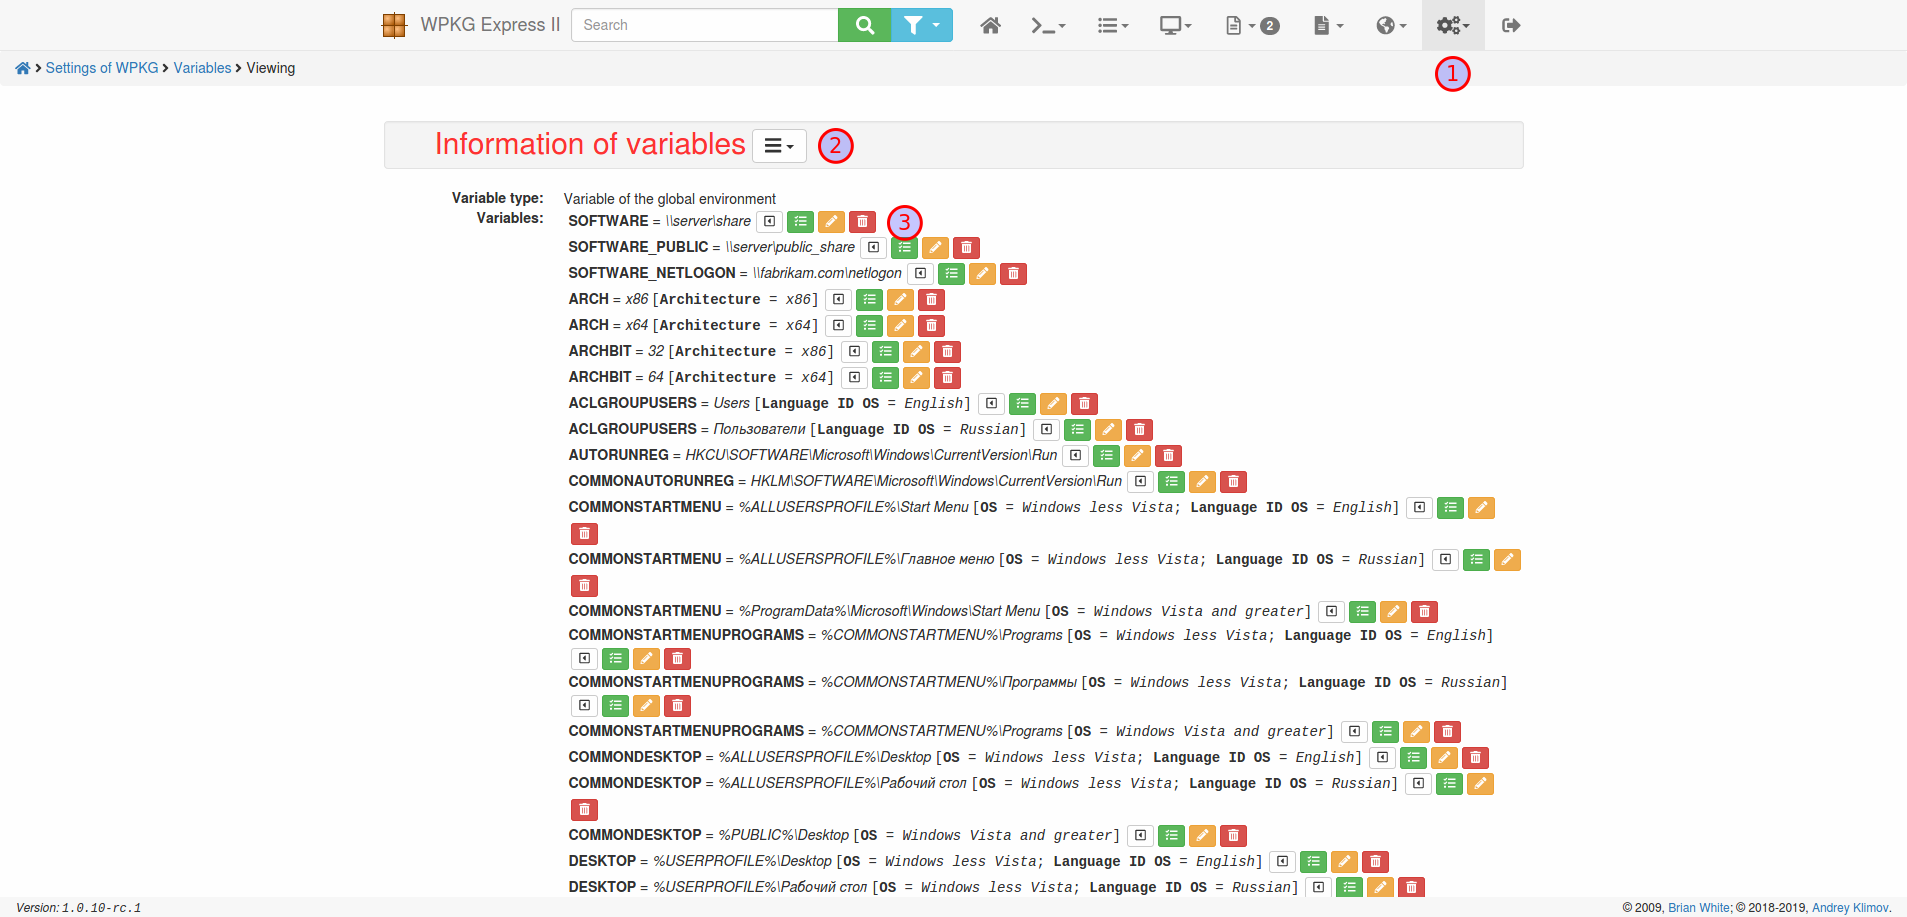](/wpkg-express-2/img/admin-variables.png)] - To manage a list of global variables, select the menu item "Application settings" → "Global variables" (1); - To add a new global variable, select the appropriate item in the "operations menu" (2); - To perform operations on a variable, such as editing, copying, deleting and others, click on the appropriate operation button in the line of the selected variable (3). You can also change the position of a variable in the list. In addition, you can use attributes (quick checks) for a variable. ] --- name: creating-config-wpkg .left-column[ ## WPKG service ### - Creating a configuration file for WPKG ### - Global variables list management ### - XML creation in the editor ] .right-column[ .center[[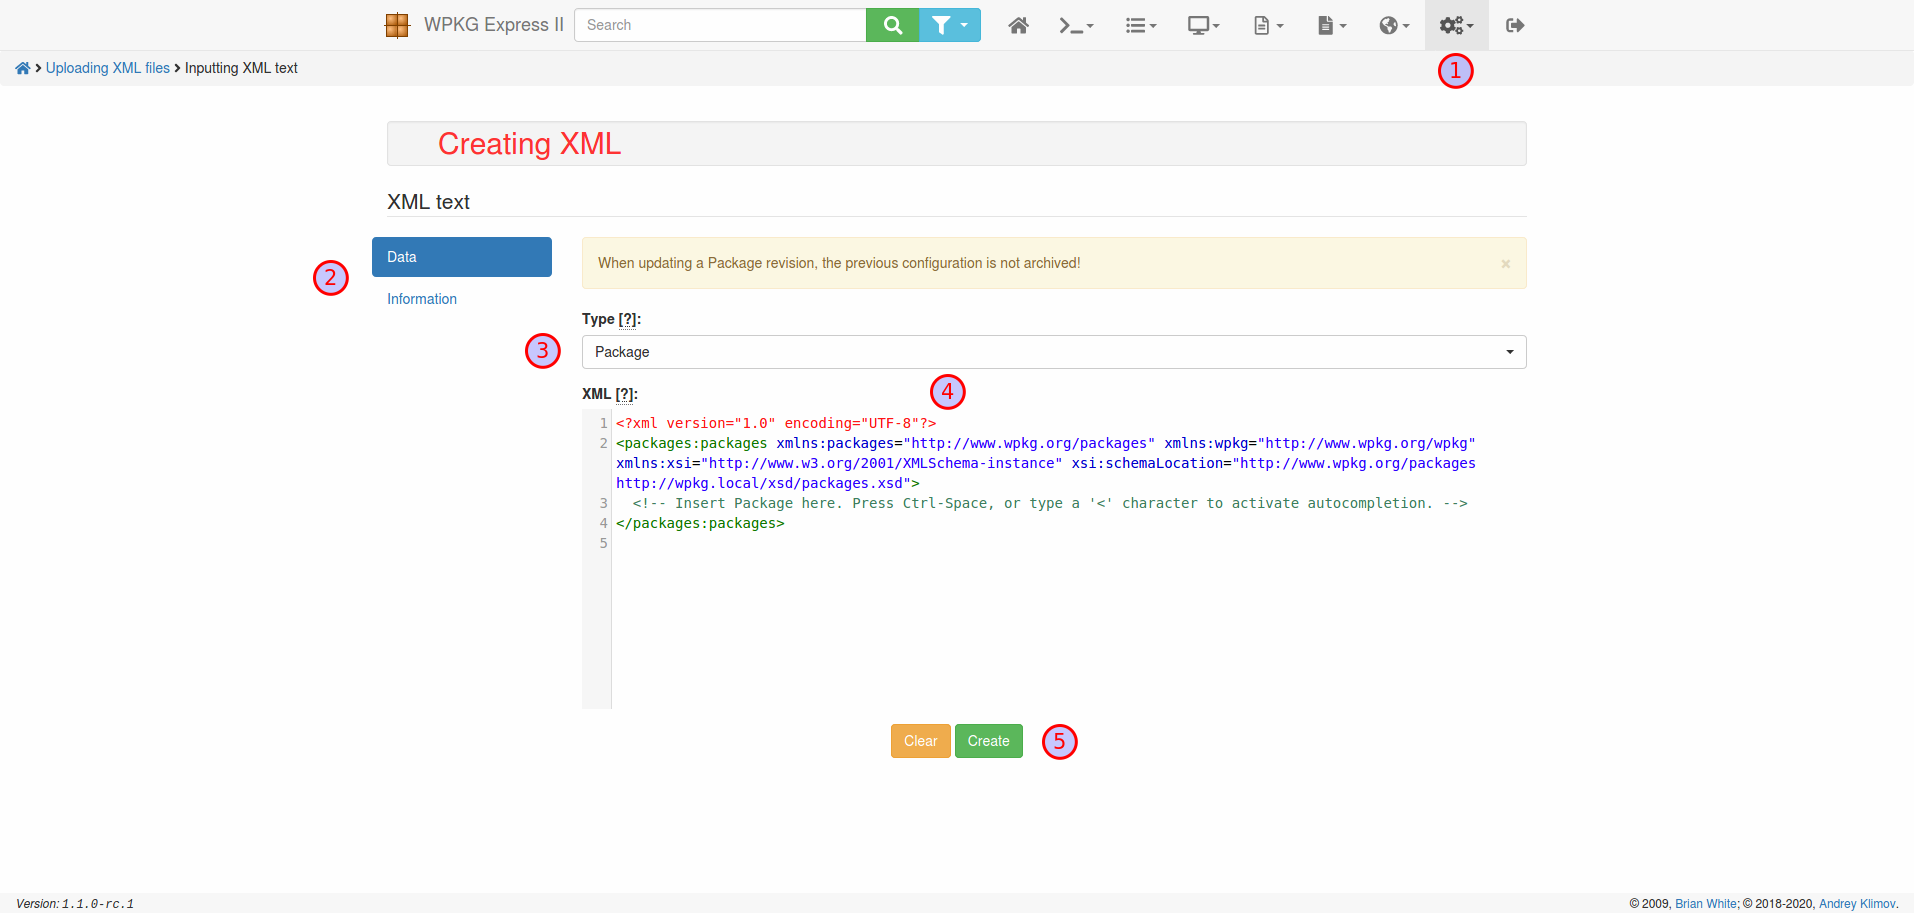](/wpkg-express-2/img/admin-creations.png)] - To create XML in the editor, select the menu item "Application settings" → "Creating XML" (1); - Use the tabs for more information (2); - Select the required XML template type from the list (3). ] --- name: creating-config-wpkg .left-column[ ## WPKG service ### - Creating a configuration file for WPKG ### - Global variables list management ### - XML creation in the editor ] .right-column[ - Enter XML in the editor field (4). If the WPKG configuration XML does not pass the validation scheme, lines containing errors will be highlighted; - Press Ctrl-Space, or type a "<" character to activate autocompletion; - Press Ctrl-J to jump to the tag that matches the one under the cursor; - To process the configuration or clear the editor, use the buttons (5). ] --- name: links .left-column[ ## Links ] .right-column[ ## Helpful information - [WPKG Express 2 Wiki](https://github.com/anklimsk/wpkg-express-2/wiki); - [List of silent install, upgrade and uninstall configurations for many programs](https://wpkg.org/Category:Silent_Installers); - [Running WPKG as a Group Policy Extension (forked from cleitet/wpkg-gp)](https://github.com/sonicnkt/wpkg-gp); - [GUI for wpkg-gp](https://github.com/sonicnkt/wpkg-gp-client). ] --- name: last-page template: inverse ## Thanks for attention Slideshow created using [remark](https://github.com/gnab/remark).